Monday, June 15, 2015

Loft and Shed Dormers

Last weekend Darrin decided to put the loft in, which he hadn't intended to do this phase, but realized it  would make it much easier to frame the shed dormers.  Here are some wonderful pictures Justin took for us. The loft is pretty big... roughly 85 square feet.


As the good weather has continued... this last weekend Darrin was able to finish the framing of the shed dormers and rafters....


The framing is just about complete... a couple of things remain, the loft windows on either end and the skylight.  Next he'll be sheathing and installing the roof. 


Monday, June 1, 2015

Raising the Roof

Another big weekend for the tiny house. And a big thank you to Justin Bendt for all of his help!

Placing the hurricane clips for the rafters and a temporary support for the ridge beam.


Construction of the ridge beam.


Placing and securing the ridge beam (which went up much easier than it probably should have)


Diggie chilling in the shade... it was pretty hot out there.


The first rafters are in here.


All the rafters in for the 90° pitch (gable roof)


Here you can see where the shed dormers will tie in for the loft. (Pretty bad graphic, but you get the idea I hope)


And finally, tarped for the coming rain.


Tune in next weekend for the shed dormers... it's supposed to be nice again. =)


Thursday, May 28, 2015

Framing begins

Over this last weekend our tiny house has seen some big changes!  It's incredibly exciting to see the little house taking real form. Here are some pictures of the wall framing in progress... Darrin with Tristan & Justin helping out


1 of the 16 tie downs used to secure the house to the trailer


The sweet little steps Jbzl (aka Justin Bendt(in picture above)) built so short people can get up into the house...


...so I could take these pictures - the bay window/booth will be at the back end of the trailer, 
(This window will need to be dropped down to table level, that was my goof... and possibly be a little bigger)
here facing our silly pool...

  
And the tongue end will be our bedroom,
here facing the driveway.


Needless to say... the house is shaping up to look a LOT different that the banner picture of this blog... may need to fix that.  We're hoping to see Neal again this weekend and maybe we can sweet talk him into some concept sketches. =)

Next up... the roof and dormer framing... stay tuned!

Sunday, May 17, 2015

Windows and a chance of thunderstorms

This weekend has been spent finishing up the floor sheathing,  drilling holes in the trailer flanges for the hold downs, and locking down the location and dimensions of the windows, and getting a quote.  Here is the placement for the main floor windows.  The loft will be easier as there are two 18" x 36" sliders on each side and a 24" x 24" picture window on each end. 


We spent some time with a guy at Home Depot getting a quote and figuring out which windows to go with.  I had originally thought we'd go with Anderson Windows, but they are considerably higher priced than Milgard.  So, we got a quote for the majority of the windows in Milgard Styleline, however I think I like their Tuscany windows better, as the Styline has an uneven frame, which I don't care for. (below) Total cost for the windows... $2,500 - $3,200.  Ouch... well they will come with Phase II - 2016

 Tuscany
 Styleline
   

We will most likely opt for some kind of grille, just not sure which yet.

Unfortunately, the weather is calling for possible thunderstorms today, so no framing this weekend. Darrin could use the break.  Hopefully, the sun will return next weekend.


Thursday, May 14, 2015

Floor Plans

I am no architect. I have taken some drafting and know a bit about reading plans, but man.... this has been a challenge! This stuff makes my head spin.

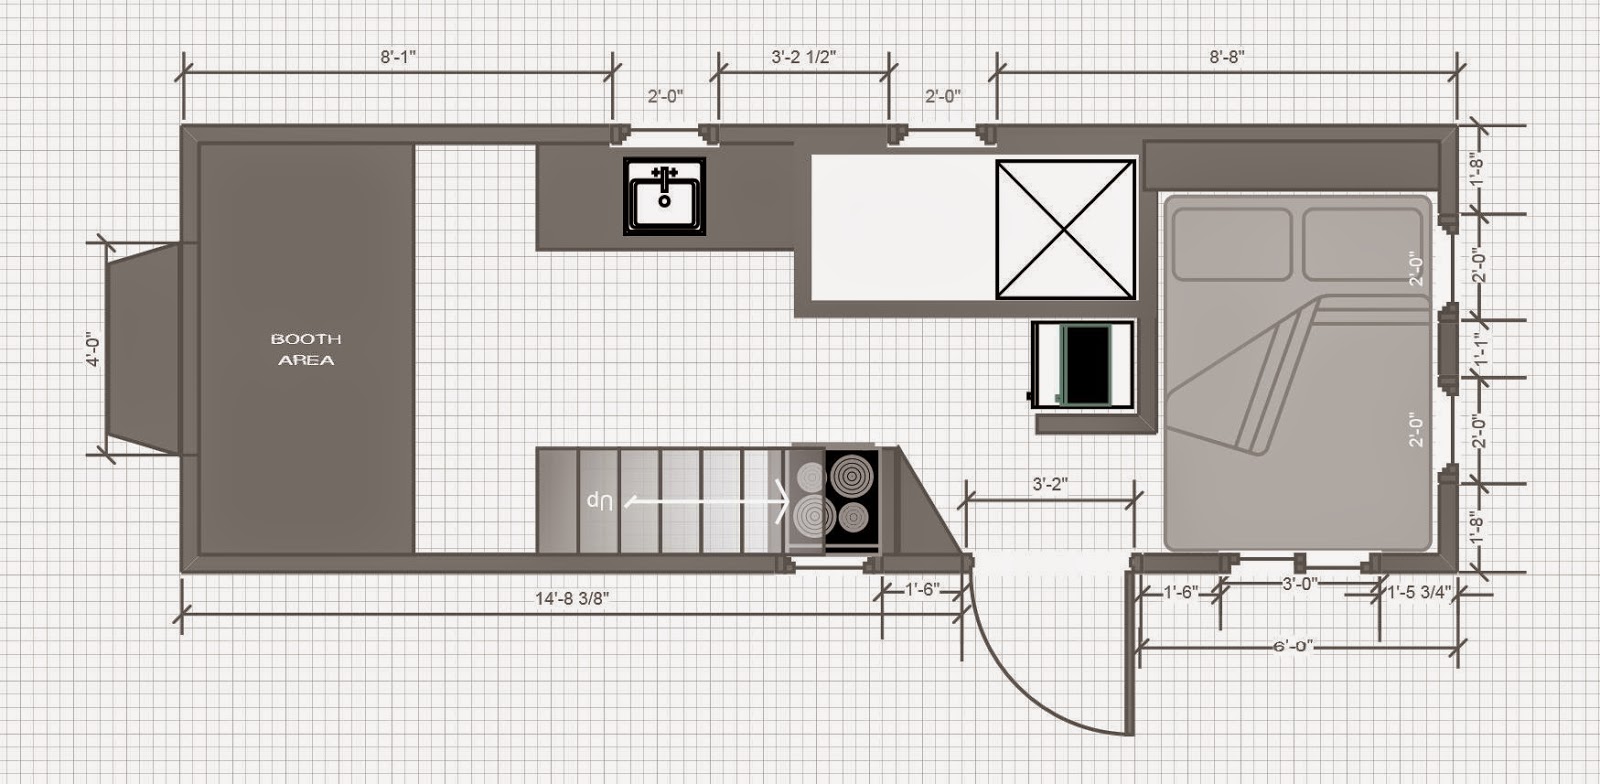
Darrin and I have spend months going over floor plans. We came pretty close to buying a set from Tumbleweed Tiny Houses, but none of the floor plans really had what we were looking for.  So, I used Visio.  There was a bit of a challenge, but after playing around a while I got to a point where I could do it... granted... this is a mess.  We anticipate more changes, but here is our latest floor plan.... Version 9. 


Here is a 3D model of the booth area that Neal did for me (Thanks Bud!) I'm hoping to get him to paint it sometime soon! We are going for a Bavarian/Chalet cabin style.  Unfortunately, I think the diamond grilles for the windows are out... they are expensive and very hard to find. =/


There were some specific things we are going for. A downstairs bedroom ... we aren't getting any younger, and stairs, as opposed to a ladder for the same reason.  Some things that have to be accounted for... You can't put the shower pan or the exterior door where there is a wheel well.  If you ever plan to park in a RV park, it is traditional to have your exterior door on the passenger side, and your hook ups on the opposite side.  Max height is 13.5', max width 8.5' anything larger requires a special permit, and a width over 10' requires a wide load pilot car, etc. All things to keep in mind.

Here are some of the earlier versions, you can see how it has changed.

V.8 is really just an earlier version of V.9

V.7 - The stairs were on the opposite side... this one felt too flat to me.

V.6  was abandoned before it was finished.

V.3, 4 & 5 are really just variations in layout. Here's V.5...


 V.4....


And V.3 ...


 V.2


 And my first attempt... V.1 (This was before we had the trailer, and is designed for a 20fter)


We had originally thought of putting a roll-out bed under the desk on the left., but to do that you have to have at least as much open floor space.

Wednesday, May 13, 2015

The Subfloor and ARGH #1

Over the last couple of weeks, the weather has been decent on the weekends and we were able to get the subfloor framed, insulated and sheathed.  Below are some pictures of the subfloor going in.


I don't have any pictures with the sheathing yet, but I'll get them posted soon.  

ARGH #1 - A word to the wise - When we bought the plywood for the sheathing, we bought  4' x 8' T&G (Tongue & Groove) What we didn't realize was Home Depot carries "scant face" T&G plywood, meaning that the face of the plywood is actually only 47 5/8" (the tongue being the last 3/8"). Our subfloor framing is 24" on center so after getting a couple pieces down, Darrin found out quickly that the plywood wasn't matching on center.... ARGH!  After doing a little internet surfing, he realized what he had bought. He made it work, but it was frustrating, and a good thing to know!